| HARK Cookbook Version 2.0.0. (Revision: 6493) |
| HARK Cookbook Version 2.0.0. (Revision: 6493) |
Problem
I want to record sound using HARK. This is the first time I am using HARK.
Solution
If this is the first time you are using HARK, start recording because this is a basic function and inevitable if you run HARK online. Note that if you just want to record, wios is convenient. see the HARK document or Recording multichannel sound for details.
:
First, get a recording device. Although you will need a multichannel recording device if you want to localize or separate sounds, you can use a microphone input on you computer if you just want to record. (see the chapter on devices in the HARK document for details).
Hereafter, we will assume that you are useing ALSA device. Run arecord -l on your terminal. You will see the list of devices, which looks like:
card 0: Intel [HDA Intel], device 0: AD198x Analog [AD198x Analog]
  Subdevices: 2/2
  Subdevice #0: subdevice #0
  Subdevice #1: subdevice #1
card 1: ** [***], device 0: USB Audio [USB Audio]
  Subdevices: 1/1
  Subdevice #0: subdevice #0
First, find the name of your device in the list. If you cannot find it, the OS does not recognize your device. If you find the device, you can specify the device name by two numbers, card and subdevice. For example, if you want to use the USB Audio, the card number is 1 and the subdevice number is #0, making the device name plughw:1,0. If you have no idea what device you are using, try plughw:0,0.
:
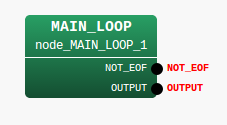
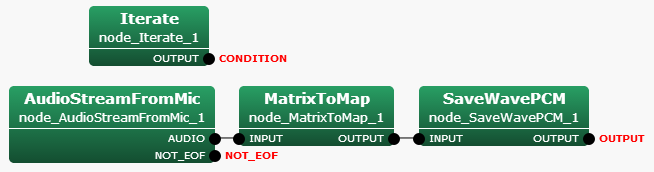
Next, build a recording network using FlowDesigner . The topology of the network is the same as shown in Fig.2.1 and 2.2. Although you can leave almost all parameters as their default, it is possible to change the parameters shown in 2.1 by yourself.
Check the specifications of you device to determine the number of channels and the sampling frequency. The device name has been specified in the section above. The number of frames to record depends on how long you want to record. This can be calculated using the equation:
| $\displaystyle Recording~ time = ( LENGTH + (number~ of~ frames- 1) * ADVANCE ) / SAMPLING\_ RATE $ | (1) |
where the uppercase variables are the parameter names of AudioStreamFromMic . For example, if you want to a record for 5 seconds at 16kHz sampling frequency with the default LENGTH and ADVANCE, the number of frames will be 498 because:
| $\displaystyle 5 [sec] $ | $\displaystyle = $ | $\displaystyle (512 + (number~ of~ frames - 1) * 160) / 16000 $ | (2) |
Node name |
Parameter name |
Type |
Meaning |
Iterate |
MAX_ITER |
Number of frames to record |
|
CHANNEL_COUNT |
Number of channels you use |
||
SAMPLING_RATE |
Sampling rate |
||
DEVICETYPE |
ALSA |
||
DEVICE |
Device name starting with plughw: |
:
Now, run the network. You will see multiple files such as sep_0.wav, sep_1.wav,..., with the number of files being the same as the number of channels. Play the files using audio players such as aplay
aplay sep_0.wav
:
If you succeeded in recording, congratulations! If not, check the following and consult the recipe: Sound recording fails.
Is the microphone connected properly? Unplug it and plug it in again.
Does the microphone need plug-in (external) power? If so, check if the battery has enough energy and if the switch is on.
Try to record with another recording software program such as wavesurfer or audacity. If you still fail to record, check the configuration of the OS, the driver, or the device itself.
If your computer has multiple sound devices, confirm the name of the device you are using. Check again using arecord -l, or try other device names.
Discussion
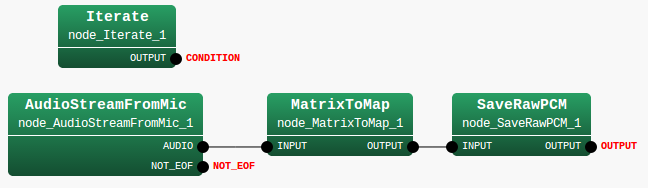
SaveWavePCM is the easiest way to record a sound. However, you can also use SaveRawPCM if you want a waveform without any headers. SaveRawPCM saves as a raw file whose format is 16 bit little-endian and extension is “.sw” Fig. 2.3 shows the subnetwork using the node.
You can read and visualize the raw file using many programming languages, for example, the python modules numpy and pylab :
    import numpy, pylab
    waveform = numpy.fromfile("sep_0.sw", numpy.int16)
    pylab.plot(waveform)
    pylab.show()
You can play the raw file using aplay:
aplay -c 1 -r 16000 -f S16_LE sep_0.sw
You can convert the raw files (.sw) to wave file using sox. For example, if you want to convert sep_0.sw recorded with 16bit, 16kHz sampling, run the following command to get sep_0.wav
sox -r 16000 -c 1 --bits 16 -s sep_0.sw sep_0.wav
See Also
The chapter on devices in the HARK document, as well as the recipe Sound recording fails, are relevant. See the recipe: Recording multichannel sound for sound recording using wios .
See the HARK document for details of nodes and parameters in the network files.
| HARK Cookbook Version 2.0.0. (Revision: 6493) |