Overview
HARK-Python3 is a package for HARK that enables Python code execution written using pybind11 .
HARK-Python3 provides two functions:
- Data visualization nodes using matplotlib and kivy (3.1.0 or later) a powerful visualization module for python.
- A wrapper to develop a HARK node using python3.
Benefits of HARK-Python3
Rich visualization
The visualization nodes implemented by HARK’s basic packages is limited. Currently only DisplayLocalization used for visualizing localization results is provided. By using HARK-Python3 package, the following visualization modules can now be used:
| The object to draw | Node name of matplotlib ver. | Node name of kivy ver. |
|---|---|---|
| Waveform | plotWaveform3 |
plotQuickWaveformKivy |
| Spectrogram | plotSpec3 |
plotQuickSpecKivy |
| Localization | plotSource3 |
plotQuickSourceKivy |
| Power of the MUSIC spectrum | plotMUSICSpec3 |
plotQuickMUSICSpecKivy |
Quick development of the new node
PyCodeExecutor3 allows you to utilize your own code. To do so, make sure to begin your code as follows:
from harkpython import harkbasenode
class HarkNode (harkbasenode.HarkBaseNode):
    def __init__(self):
        # define the output names and types of your node as tuples here.
    def calculate(self):
        # write your code here.
Then, build a network that uses PyCodeExecutor3.
Installation
For Windows users
- Install HARK for Windows using the installer. See Windows HARK installation instructions for details.
For Ubuntu users
Add HARK repository and install Basic HARK Packages. See Linux HARK installation instructions for details.
Install HARK-Python3
sudo apt install hark-python3 python3-numpy python3-matplotlib
Getting Started
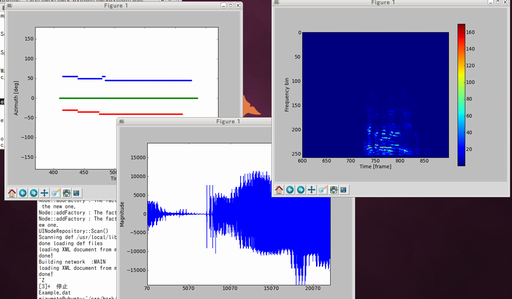
Tutorial 1: Run examples
Download HARK-Python3 examples
Run the following command
batchflow plotSource3Network.n plotSourceExample.xml
batchflow plotSpec3Network.n 2SPK-jp.wav
batchflow plotWaveform3Network.n 2SPK-jp.wav
batchflow plotMUSICSpec3Network.n 2SPK-jp.wav
Then, you will see graphs drawn by matplotlib.
Tutorial 2: Implement your node with python
The goal is to calculate \(input1^3 + input2^5\)
1. Place 2 Constants and a single PyCodeExecutor3 node into your HARK network.
Right-click on PyCodeExecutor3’s output terminal, select “Set as Output”,
and change the default value to “output”. Add input terminals “input1”
and “input2” to PyCodeExecutor3 by right-clicking on PyCodeExecutor3’s
node and selecting “Add Input”. Once completed, connect all nodes and save
it as tutorial2.n.
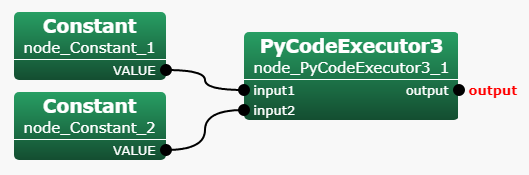
- Set parameters
- node_Constant_1: int 3
- node_Constant_2: int 5
- PyCodeExecutor3: default.
- Write the code depicted bellow. Save it as
samplecode.pyin the same path as the network file.
from harkpython import harkbasenode

class HarkNode(harkbasenode.HarkBaseNode):
    def __init__(self):
        self.outputNames=("output",)  # one output terminal named "output"
        self.outputTypes=("prim_float",)  # the type is primitive float.

    def calculate(self):
        self.outputValues["output"] = self.input1 ** 3 + self.input2 ** 5
        # set output value
        # from two inputs: input1 and input2.
Run
batchflow tutorial2.n
- Then, you will see the following output result
<Float 3152 >
Description
How to writing Python3.x code for HARK-Python3
Several points to keep in mind in the Python code for HARK-Python3.
- Always import the
harkbasenodemodule. - Create a Node class that inherits from the
harkbasenode.HarkBaseNodeclass. - Add a
calculate()method that performs per-frame processing to the Node class. - Set the output terminal name and type appropriately. This determines the output terminal name and data type when using the PyCodeExecutor3 node in a network file.
- The value to be output must match the type specified in advance.
- When performing real-time processing assuming microphone array input etc,
calculate()method should not block for more than 1 frame processing time. - In cases where container data types such as
Vector,MatrixandMapare used, always write code that consides with empty elements. - The input/output terminal are case sensitive.
harkbasenode
The harkbasenode module contains the basic interface to connect your python code and HARK.
In order to implement Node code in HARK-Python3, it is necessary to create a class that inherits harkbasenode.HarkBaseNode class. In addition, classes that inherit harkbasenode.HarkBaseNode require the calculate() method.
In other words, it looks like the following example.
from harkpython import harkbasenode

class YourNodeName(harkbasenode.HarkBaseNode):
    def __init__(self):
        pass

    def calculate(self):
        pass
For details, in python interpreter, run
from harkpython import harkbasenode
help(harkbasenode)
Naming convention for node’s input/output terminals
In HARK standard nodes, input/output terminal names are unified so that they consist of only a combination of upper case character strings and underscores. There are also cases where numbers have been added at the end. But in fact it is more flexible.
You can use case-sensitive alphanumeric characters, underscores, and several other symbols. It is recommended to use only alphanumeric characters and underscores as symbols may cause trouble.
For example, the following names can be used without any problem.
INPUT1,Input1,input1, andINPUT_1(These are all recognized as separate input terminals.)OUTPUT_PCM,OutputPCM,Output_PCM, andout1(The same is true for output.)
Container type conversions
Container type of HARK is converted as follows:
| Container type | Python type | Notes |
|---|---|---|
Vector<ObjectRef> |
numpy.ndarray or list | It is list only in the case of Vector<Source> . If the element is int or float , it will be a numpy.ndarray . |
Matrix<ObjectRef> |
numpy.ndarray | In the current version it will always be numpy.ndarray . |
Map<int, ObjectRef> |
dict | Usually, Vector or Matrix are stored using Source ID (intager value) as a dict’s key. |
Source |
dict | Since Source is expressed as a class (structure) in C++, members of the structure are managed by each key. The keys include id , x , and power . In addition, the key x stores coordinates representing a point in Euclidean space as a list format as [x, y, z] . |
Compatible input/output terminal types
The names of output terminal types have the following regularity.
- Names are always separated by an underscore.
- e.g.)
aaaa_bbbb,aaaa_bbbb_cccc
- The first element is the container name. There are the following four container names. For primitive types that do not have containers,
prim_is used. - e.g.)
prim_*,vector_*,matrix_,map_*
- The first element is the container name. There are the following four container names. For primitive types that do not have containers,
- The next element is the type of value stored in the previous container. Containers can be nested.
- The last element is always a type.
- e.g.)
*_bool,*_int,*_float,*_complex,*_string,*_source,*_vector_float,*_vector_complex
The following is an example that HARK-Python3 support. Types not listed here may not work.
| HARK type | Python type | Output type | Value example |
|---|---|---|---|
Bool |
bool |
prim_bool |
True
|
Int |
int |
prim_int |
1
|
Float |
float |
prim_float |
0.1
|
Complex<float> |
complex |
prime_complex |
1+2j
|
String |
str |
prim_string |
"Hello"
|
Source |
dict(key='id','x','power') |
prim_source |
{'id': 1, 'x': [0.5, 0.86602540378, 0.], 'power': 32.5224}
|
Vector<int> |
numpy.ndarray(1dim) |
vector_int |
[1 2 3]
|
Vector<float> |
numpy.ndarray(1dim) |
vector_float |
[0.1 0.2 0.3]
|
Vector<complex<float> > |
numpy.ndarray(1dim) |
vector_complex |
[1+9j 2-8j 3+7j]
|
Vector<Source> |
list |
vector_source |
[{'id': 1, 'x': [0.86602540378, 0.5, 0.], 'power': 31.4316},
 {'id': 2, 'x': [0.86602540378, -0.5, 0.], 'power': 30.9881}]
|
Matrix<int> |
numpy.ndarray(2dim) |
matrix_int |
[[1, 2, 3],
 [4, 5, 6],
 [7, 8, 9]]
|
Matrix<float> |
numpy.ndarray(2dim) |
matrix_float |
[[1.1, 2.2, 3.3],
 [4.4, 5.5, 6.6],
 [7.7 8.8 9.9]]
|
Matrix<comlex<float> > |
numpy.ndarray(2dim) |
matrix_complex |
[[1.1+9.9j, 2.2-8.8j, 3.3+7.7j],
 [4.4-6.6j, 5.5+5.5j, 6.6-4.4j],
 [7.7+3.3j, 8.8-2.2j, 9.9+1.1j]]
|
Map<int, Vector<int> > |
dict |
map_vector_int |
{1: array([1, 2, 3]),
 2: array([4, 5, 6]),
 3: array([7, 8, 9])}
|
Map<int, Vector<float> > |
dict |
map_vector_float |
{1: array([1.1, 2.2, 3.3]),
 2: array([4.4, 5.5, 6.6]),
 3: array([7.7, 8.8, 9.9])}
|
Map<int, Vector<complex<float> > > |
dict |
map_vector_complex |
{1: array([1.1+9.9j, 2.2-8.8j, 3.3+7.7j]),
 2: array([4.4-6.6j, 5.5+5.5j, 6.6-4.4j]),
 3: array([7.7+3.3j, 8.8-2.2j, 9.9+1.1j])}
|
Map<int, Float> |
dict |
map_prim_float |
{1: 0.1, 2: 0.2, 3: 0.3}
|
In summary, it looks like the following example. You will see that the input and output terminal names match on the network file side and the Python code side.
<work_path>/yournetwork.n
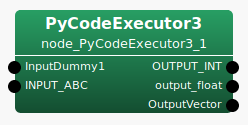
<your_path>/yourmodule.py
from harkpython import harkbasenode

class YourNodeName(harkbasenode.HarkBaseNode):
    def __init__(self):
        self.outputNames=("OUTPUT_INT", "output_float", "OutputVector",)
        self.outputTypes=("prim_int", "prim_float", "vector_float",)

    def calculate(self):
        print(self.InputDummy1)
        print(self.INPUT_ABC)
        self.outputValues["OUTPUT_INT"] = 1
        self.outputValues["output_float"] = 1.1
        self.outputValues["OutputVector"] = [1.1, 2.2, 3.3, 4.4, 5.5, 6.6]
Special instance variable of HarkBaseNode class
These instance variables are set from the HARK (C++ code) side.
- self.nodeName
- The name of the node. e.g.)
node_PyCodeExecutor3_1. - self.nodeID
- The ID of the node. If the node name is
node_PyCodeExecutor3_1, the ID is1. - self.count
- The number of iterations. In other words, this is a frame count.
Let’s try to use self.count variable. The following example plots the input FFT data every 50 frames.
import numpy
from matplotlib import pyplot
from harkpython import harkbasenode

class YourNodeName(harkbasenode.HarkBaseNode):
    def __init__(self):
        self.outputNames = ("OUTPUT",)
        self.outputTypes = ("prim_int",)

        self.isFirst = True
        self.specgram = []
        self.winlen = 300
        pyplot.ion()

    def calculate(self):
        self.FFT = numpy.array(self.FFT)
        self.specgram.append(abs(self.FFT[0, :]))

        if self.count % 50 == 0:
            if len(self.specgram) > self.winlen:
                self.specgram = self.specgram[len(self.specgram)-self.winlen:]

            pyplot.clf()
            pyplot.imshow(numpy.flipud(numpy.array(self.specgram).transpose()))

            if self.isFirst:
                pyplot.colorbar()
                self.isFirst = False
            pyplot.xlim([0, self.winlen])
            pyplot.xticks(range(0, self.winlen, 50),
                         range(self.count - self.winlen, self.count, 50))
            pyplot.xlabel("Time [frame]")
            pyplot.ylabel("Frequency bin")
            pyplot.pause(0.01)

        self.outputValues["OUTPUT"] = 0
How to use PyCodeExecutor3
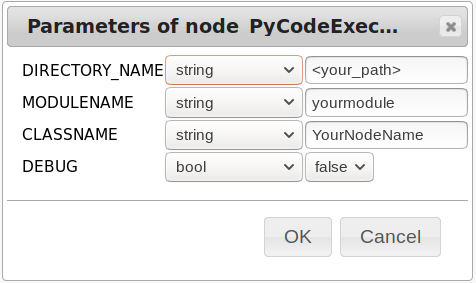
How do the parameters of the PyCodeExecutor3 node work?
- DIRECTORY_NAME
- This path is added to the python path. So, specify the path where your Python code is located here.
- MODULENAME
- The module name written here is imported into Python. So, specify the module name of your Python code (a filename without the
.pyextension) here. - CLASSNAME
- The class name in your Python code that will be instanciated.
The concept of how HARK calls the PyCodeExecutor3 node and how your Python code is executing is shown below in Python code representation. The difference is that, in fact, data is input in a stream (frame by frame), and processing results are also extracted in a stream (frame by frame).
import sys
sys.path.append(DIRECTORY_NAME)
import MODULENAME
object = MODULENAME.CLASSNAME()

object.nodeName = "node_PyCodeExecutor3_1"
object.nodeID = 1
object.count = 0

input_frames = {'input1': [[data1, data2, ...], [data1, data2, ...], ...],
                'input2': [[data1, data2, ...], [data1, data2, ...], ...],
                ...
                'inputX': [[data1, data2, ...], [data1, data2, ...], ...]}
#                          <==== frame01 ====>  <==== frame02 ====>  ...

output_frames = {}

# HARK stops when CONDITION terminal of any node of HARK becomes False.
while True:
    for (k,v) in input_frames.items():
        object.__dict__[k] = v[object.count]

    # For each iteration, calculate() is called
    object.calculate()

    for (k,v) in object.outputValues.items():
        output_values[k] = output_values.get(k, [])
        output_values[k].append(v)

    object.count += 1
Tips
Can I add a parameter to the script?
Currently, PyCodeExecutor3 does not pass the given parameters to the scripts. Instead, since PyCodeExecutor3 can receive an arbitrary number of inputs, you can realize this using a Constant node.
For example, adding subnet_param named THRESHOLD to PyCodeExecutor3,
- Add THRESHOLD input to PyCodeExecutor3.
- Add Constant node and connect its output to THRESHOLD.
- Change the type of the VALUE of the Constant node to
subnet_param.
Can I improve the calculation speed?
Some tips exist to improve processing speed.
Use python packages to increase speed: For example, using
numpyorscipywill improve the scientific computation including matrix calculation,cythonfor using C functions, orscipy.weavefor embedding C++ code into your python code.Skip calculation For example, plotting is too heavy to execute at every frame (i.e., 10 msec for default setting). In that case, you can use an instance variable
self.countto execute the function at a regular interval.Here is an example code:
def calculate(self):
  if not self.count % 100 == 0:
    break

  # do some heavy_calculation
However, if the computational speed requirements are very high, use HARK-Python for prototyping only and eventually implement the code in C++. This is the standard way in HARK.